The editor
Select part of the world and save it as a schematic, or put a loaded build in place with the mouse. Every tool, every click and what the wheel does.
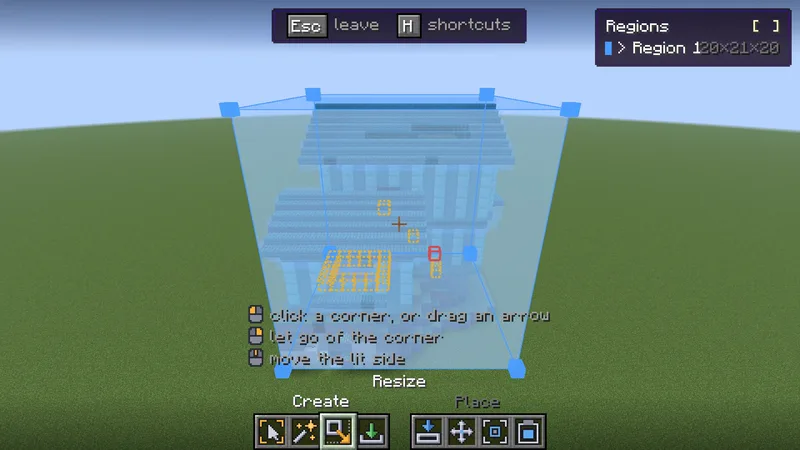
The editor is where you work on builds with the mouse, right in the world. Use it for two things: save part of the world as a new schematic, and put a loaded build in place. The clip shows both: Magic select takes part of a house, the box follows, then one gizmo moves and turns a build.
Nothing in the editor changes the world. It shapes boxes and moves ghosts. Only Paste writes blocks, and it asks first.
Open and leave #
- Press G (up to 0.1.25 it was B). A bar at the top of the screen says how to leave, and the toolbar shows along the bottom.
- Fly around to look at the build from any side. Your player stays where it was.
- Press Esc or G to leave. You are back in your own body.
Esc first cancels what is half done, a drag included. Press it again to leave. Whatever key opens the editor, Esc gets you out, and so does /buildprint editor. The pause menu has Leave the BuildPrint editor while it is open.
The editor also closes by itself when your body gets hurt while the camera is away, when you die, change dimension or leave the world.
The tools #
The toolbar has two groups. Create is for making a schematic, Place for putting a loaded build where it belongs. Just above the toolbar, the editor always says what the left button, the right button and the wheel do right now, so you never have to remember it. A second line says what the part you aim at does.
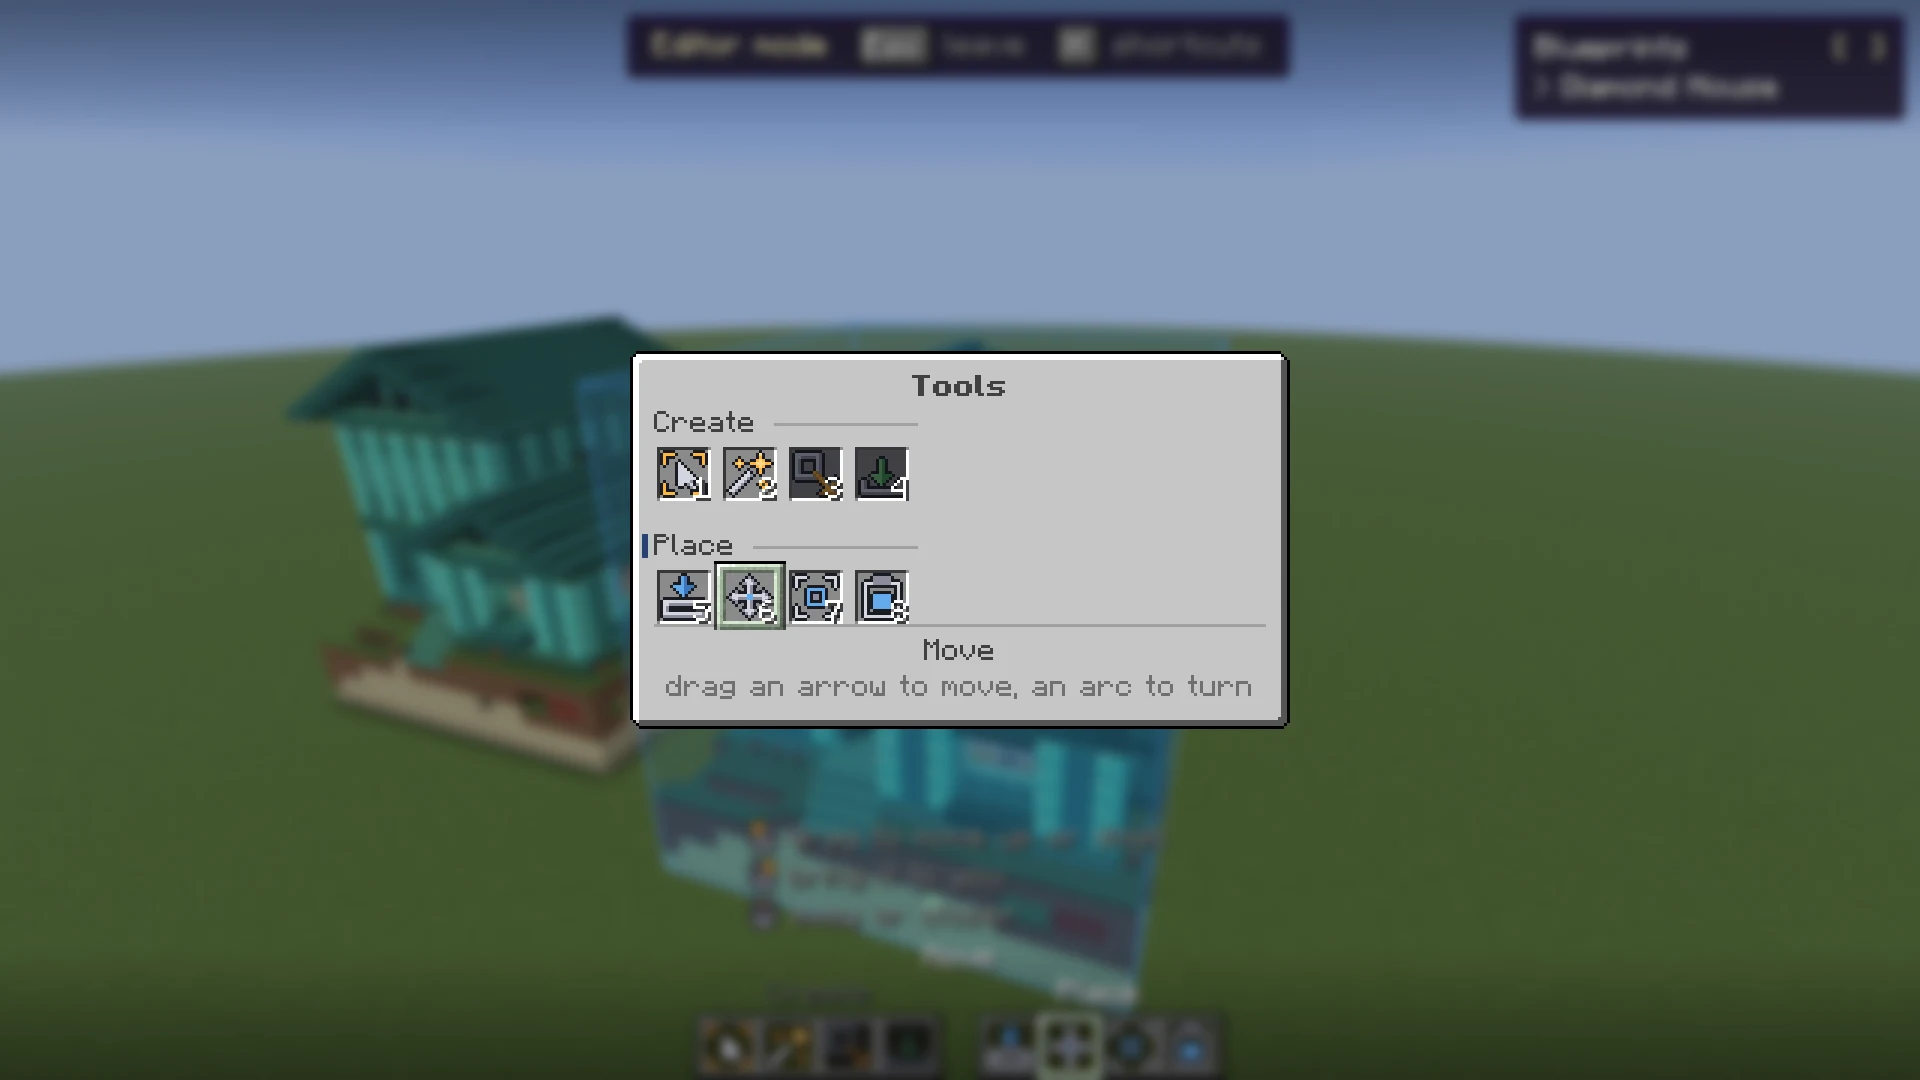

Select
1 Click two blocks: the corners of a box. Corners go through grass and flowers to the ground.
 Remove the box you aim at, or a half-made one.

Magic select
2Click to add what is joined up and alike. What a click would take lights up first.Take out what you aim at.
Resize
3Click a corner to work on that corner alone, then drag an arrow.Let go of the corner.
Save
4Save the boxes as a new schematic.
Place
5Drop the build where you aim.Bring the build to where you are.
Move
6Drag an arrow to move the build, an arc to turn it. Click off the gizmo to switch to the build you aim at.Off the gizmo: bring the build to you. On an arc: a quarter-turn back. On the white cube: flip it.
Auto align
7Find where the build belongs and put it there.Stop searching.
Paste
8Choose how the build goes into the world. Only on the toolbar where pasting works. See Paste.
Change tool #
| Key | Action |
|---|---|
| 1 to 8 | Pick a tool by its place on the toolbar |
| QorE | Previous or next tool. These follow your drop and inventory keys |
| Alt + Scroll | Next or previous tool, whatever you hold |
| Tab | Every tool in one window, to click or pick with a number |
Where pasting does not work, Paste is not on the toolbar, and a tool another mod adds moves up to its number.
The scroll wheel #
The wheel works on the tool in your hand, and the line above the toolbar says what it does now, keys held included.
| With | The wheel | On screen it says |
|---|---|---|
| Select or Resize, with a box | Moves the side of the box you aim nearest. See Resize a box. | move the lit side |
| Resize, with a corner picked | Moves that corner the way you face. | move this corner where you face |
| Magic select | Changes what a click picks. See Magic select. | change what a click picks |
| Place or Move | Pushes the build away or brings it closer, a block a step, along the axis nearest to where you look. | away or closer |
| Save, Auto align, Paste, or nothing to work on yet | Camera speed. When you walk, the next tool. | camera speed |
| Ctrl and the wheel, any tool | Camera speed. When you walk, the next tool. | camera speed |
| Alt and the wheel, any tool | The next tool. | next tool |
Shift is never part of this: it only flies the camera down.
The tool guide #
The first time you hold a tool, a tooltip walks you through it, next to what it is talking about in the world. It moves on when you have really done the step, also if you did it with another tool. Enter skips the guide for that tool. Tool guide, under Placements in the Schematics tab of the settings, turns it off, and /buildprint reset starts it again.
Put a build in place #
Load the build first, from the Local tab of the menu (see Loading schematics). The list at the top right of the editor shows your loaded builds, with an arrow at the one the tools work on. Step through them with [ and ], or click a build with Move, Auto align or Paste to switch to it.
- Press G and fly to where the build should go.
- Pick Place (5) and left-click the ground where you want it. Right-click instead to bring it to where you are. Scroll to push it away or bring it closer.
- Pick Move (6). Drag the arrows until it sits right, and drag or click the green arcs to turn it. See the gizmo below.
- Is part of it built already? Pick Auto align (7) and click the build: BuildPrint finds the blocks that are already standing and puts the ghost on them. See Moving and aligning.
- Press Esc. The build stays where you put it.
Wrong-block marks hide while you place or move a build, so they do not cover the gizmo. They come back when you leave the Place tools.
The gizmo #
Move does both moving and turning, with one gizmo. There is no Rotate tool any more.
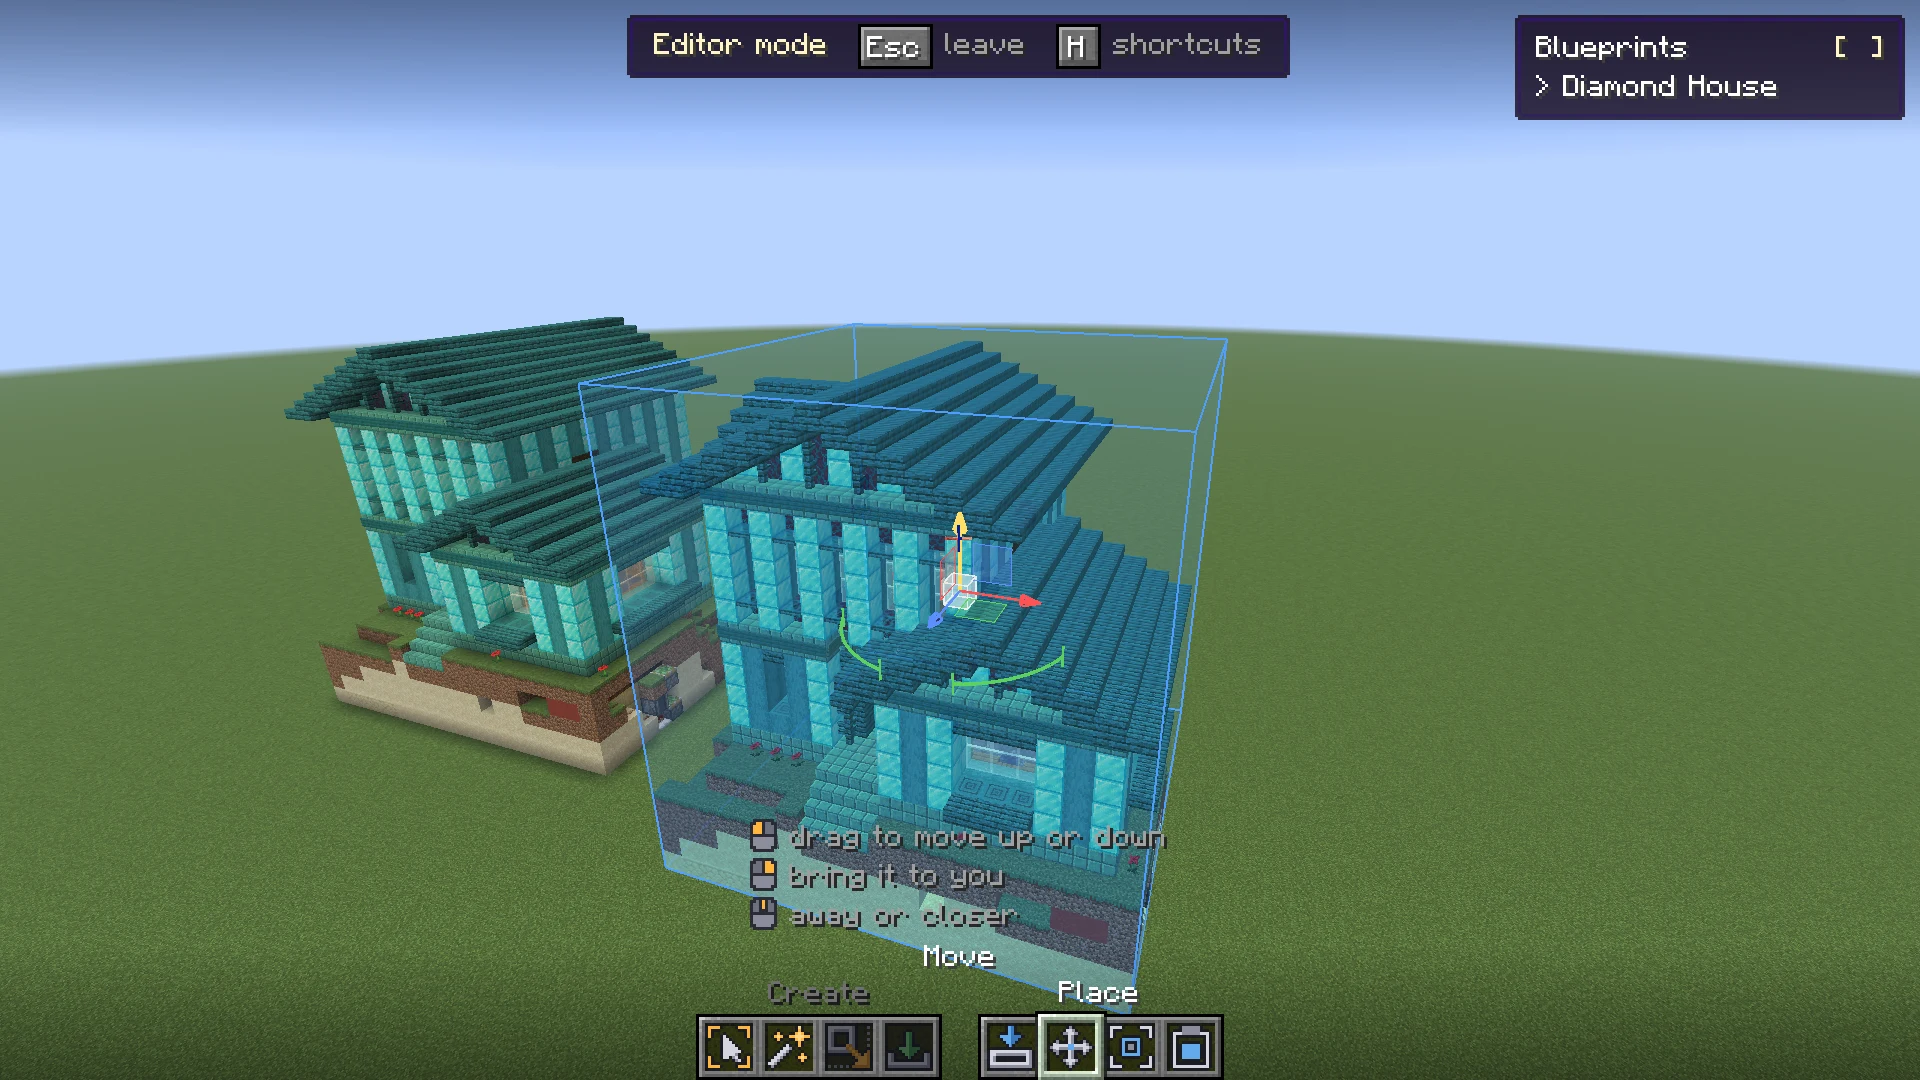
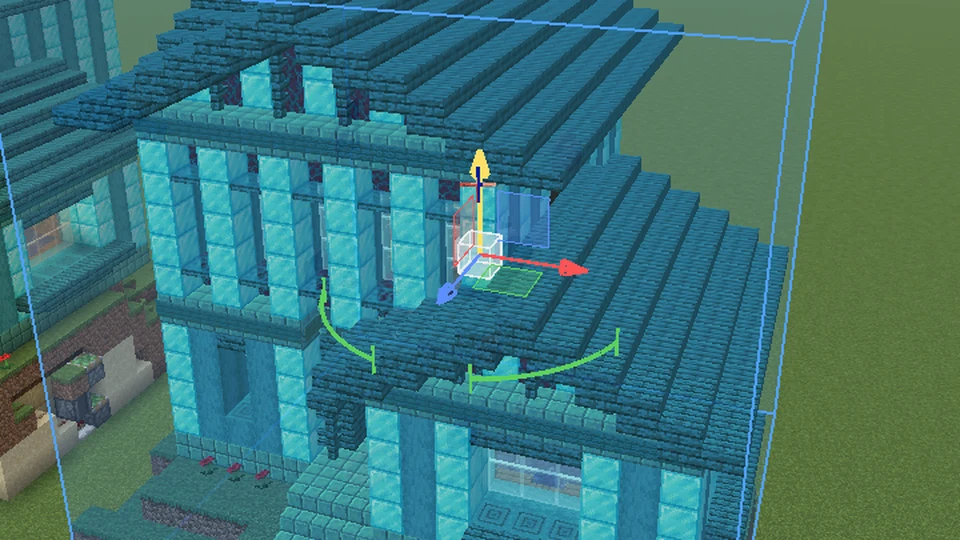
| Part | Left mouse | Right mouse |
|---|---|---|
| The red arrow | Drag: east or west | |
| The green arrow | Drag: up or down | |
| The blue arrow | Drag: north or south | |
| A flat square | Drag: along the two arrows it sits between, for example across the ground | |
| The white cube in the middle | Drag: freely, across what you see | Flip the build. Again flips it back |
| A green arc | Click: a quarter-turn clockwise. Drag: turn it round, snapping to quarter turns | A quarter-turn back |
| Off the gizmo | Click: switch to the build you aim at | Bring the build to you |
Aim with the crosshair, hold the left mouse button and move the mouse. The build moves a whole block at a time. With turning and flipping you reach every way a build can face. Esc during a drag puts it back.
The gizmo keeps its size from further away, so it stays easy to grab.
Turn around a block #
- Press P on a block, on the build or in the world, and the gizmo goes to that block. The build now turns around it. Alt and a click off the gizmo does the same.
- R, or P on the same block again, puts the gizmo back in the middle of the build.
Move without dragging #
| Key | Action |
|---|---|
| Scroll | Push the build away or bring it closer, with Move or Place |
| Arrow keys | With Move: a block forward, back or sideways, from the way you face. Hold to keep going |
| Page UporPage Down | With Move: a block up or down |
Landing on the ground #
A build that stands on the ground stays on it while you drag it across, and dragging it down lands it there. Hold Alt while you drag to move it freely. Snap in the editor, under Placements in the Schematics tab of the settings, turns this off.
Save a schematic #
- Make a box around what you want to save: with Select, or with Magic select.
- Fit it. See Resize a box.
- Want more than one box in the same schematic? Press N with Select or Magic select, then make the next one.
- Pick Save (4) and click. Give it a name and, if you like, a description.
- Quick Export saves into
schematics/. Save As... lets you choose a folder.
The file holds blocks, signs with their text, banners with their patterns, and decoration made of entities: armor stands, item frames, paintings, minecarts and boats. Mobs, dropped items and arrows are left out. After saving, the selection is cleared. Load the file from the Local tab when you want to build it.
In single-player the file also holds what is inside the containers, and which crafter slots are locked.
On a server your game does not know what is inside a chest until you open it. Containers you opened in this session are saved with their contents. The others are saved empty, and a chat line says how many. Open them and save again to include them.
A server can turn off saving schematics of its world. Loading your own schematics still works there. See Servers.
Big saves #
- A save of any size runs in the background, with its progress above the hotbar, so you can keep playing. If it fails, a file of that name stays as it was.
- In single-player a save reaches past your render distance: it reads the saved world, containers included.
- On a server it has what your game has loaded. With Bobby installed it also fills in the chunks Bobby remembers, but not the entities in them.
If a selection on a server holds chunks you have not seen yet, the save waits for you. A card shows how many chunks are still to see, how far away the nearest is and which way, and marks show the area in the world. Walk or fly through it, and it saves by itself once none are left.
| On the card | What it does |
|---|---|
| Save now | Saves what has been seen so far, with gaps. Saving again does the same. |
| Stop | Drops this save. |
The card is Saving a big selection on the HUD tab of the settings.
Select a box #
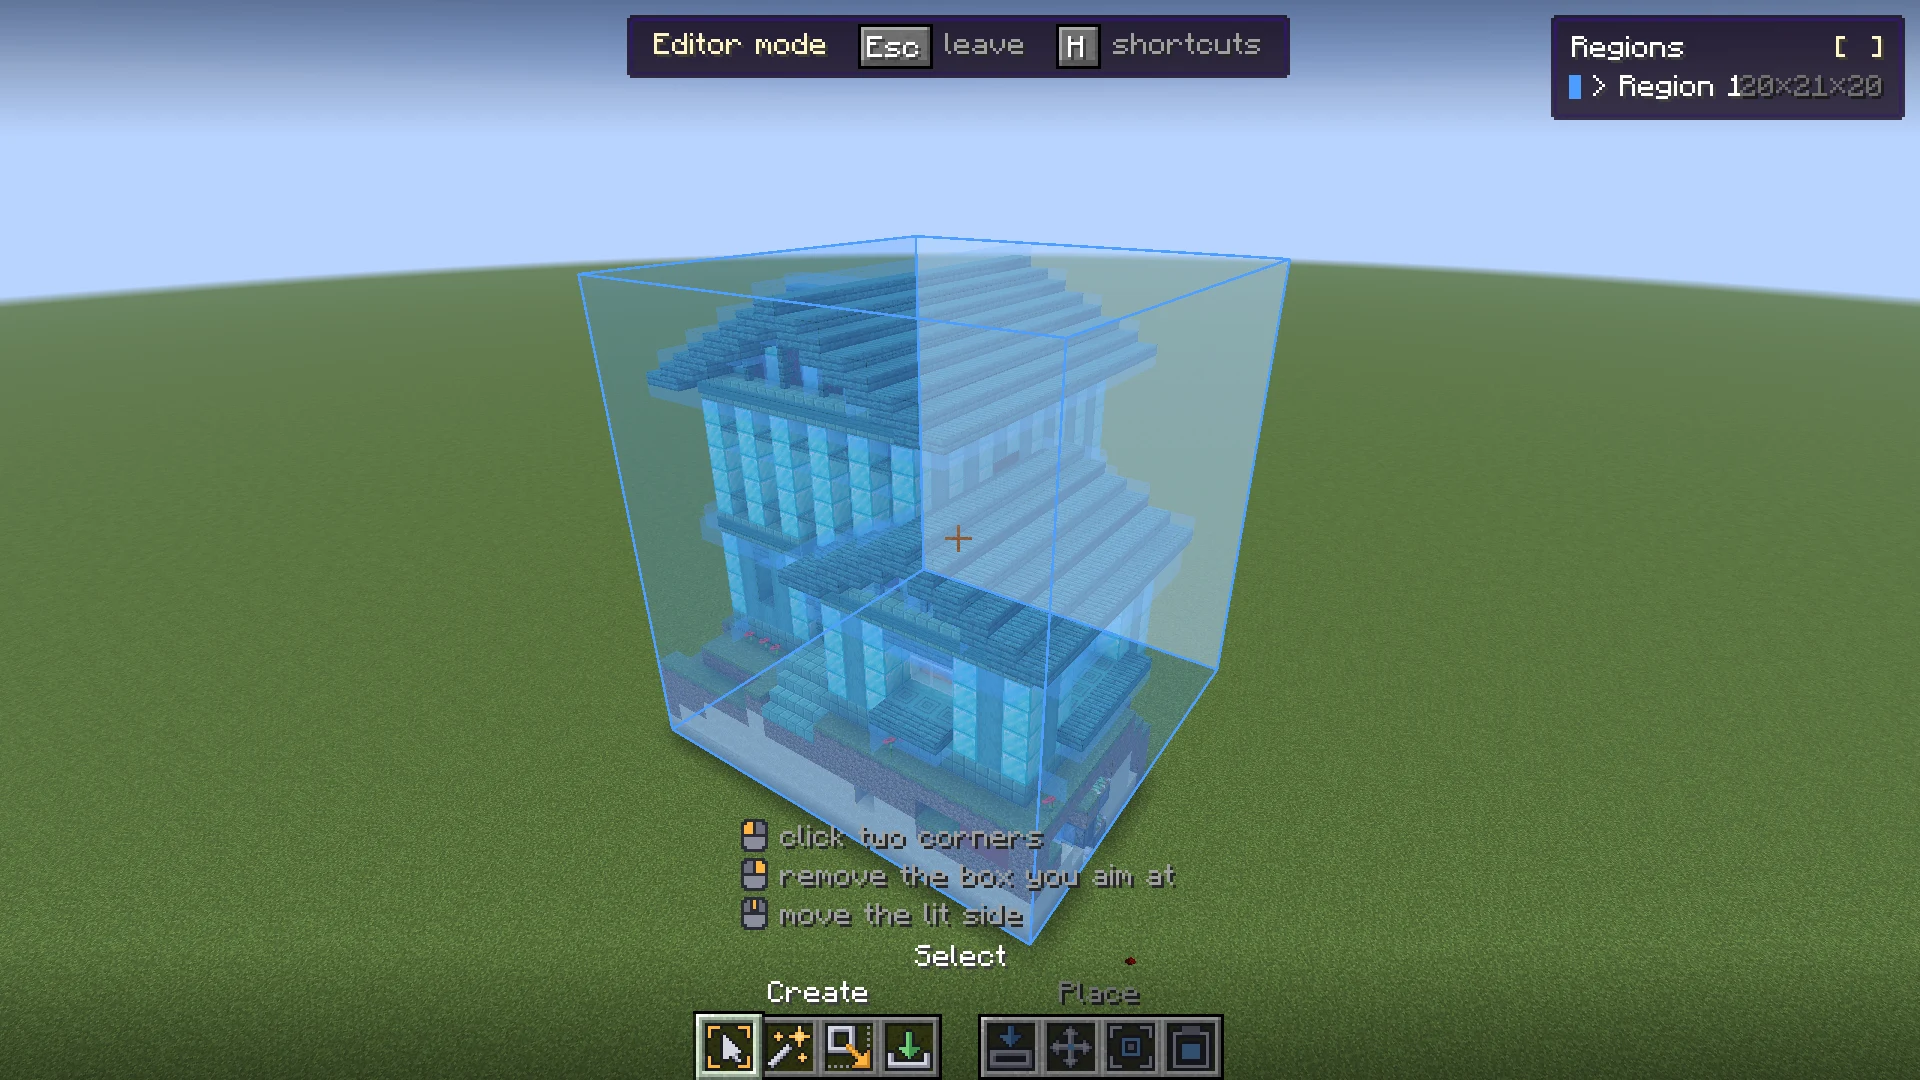
- With Select (1), click one corner, then the opposite corner. A blue box shows what is in, and the blocks in it are tinted while you draw or resize it.
- Two more clicks change the box you have. A new box only comes from N, so none appears by accident.
- Right-click removes the box you aim at, or a box you only started.
- Delete or Backspace removes the active box. Ctrl + Z brings it back, and Ctrl + Shift + Z redoes.
- [ and ] step through the boxes.
- The list at the top right shows the boxes, each with its color and size.
Selections belong to their dimension: a box made in the Nether is back when you return there. Leaving the world clears them all.
Magic select #
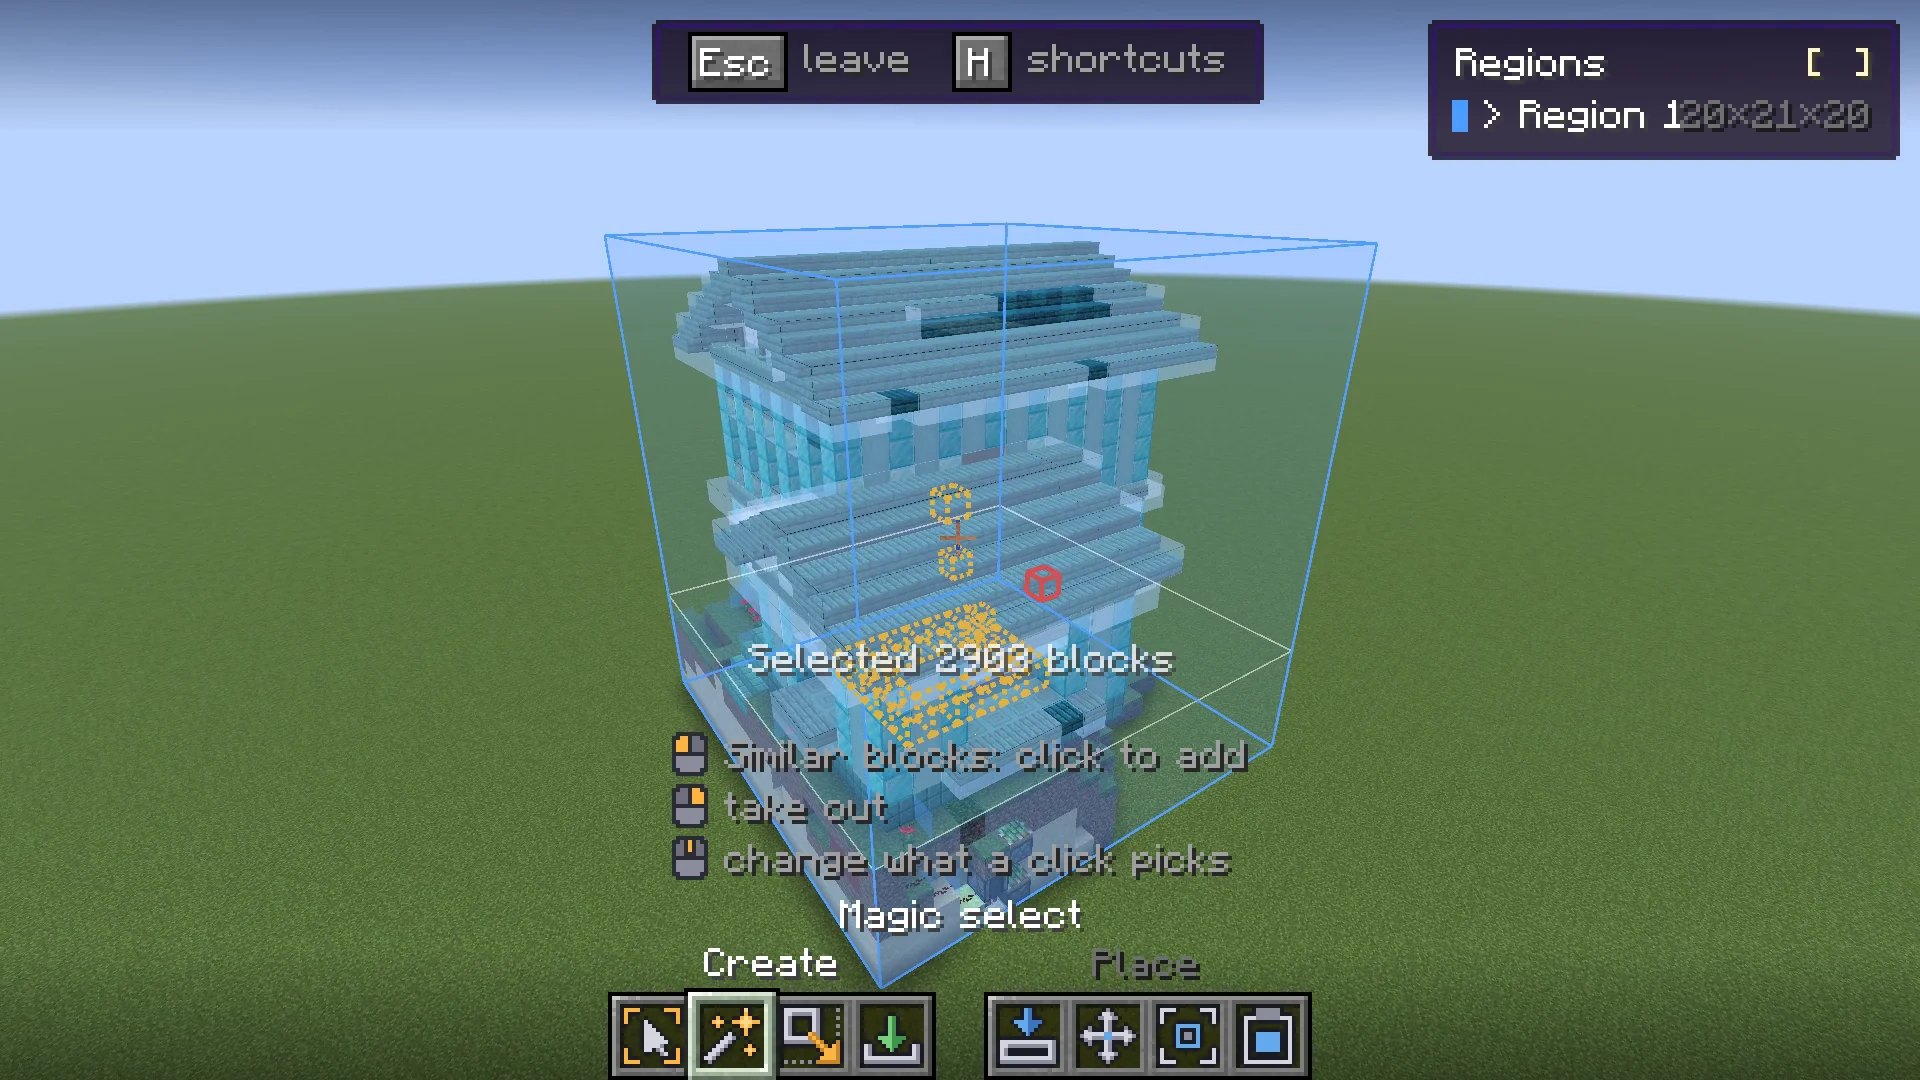
Magic select (2) draws the box for you. Look at a build and what a click would take lights up. Click to take it, click somewhere else to add more, and the box grows to fit. Everything in the box is saved, so also what stands between the blocks you picked.
Scroll to change what a click picks. The line above the toolbar names the mode.
| Mode | A click takes |
|---|---|
| Same block | What is joined up and the same block. |
| Similar blocks | The default. What is joined up and alike: oak with oak, stairs with stairs, redstone as one machine, leaves as a whole tree of any mix of blocks. |
| Wall, floor or roof | The wall, floor or roof you aim at. |
| Whole build | The whole build, without the ground it stands on. So does /buildprint select magic. |
- Right-click takes out what you aim at.
- Ctrl + Z undoes the last click.
- N first makes the next click a new box.
- To trim layers off, go to Resize and scroll the side.
- One click takes at most 400,000 blocks, and it says so.
Resize a box #
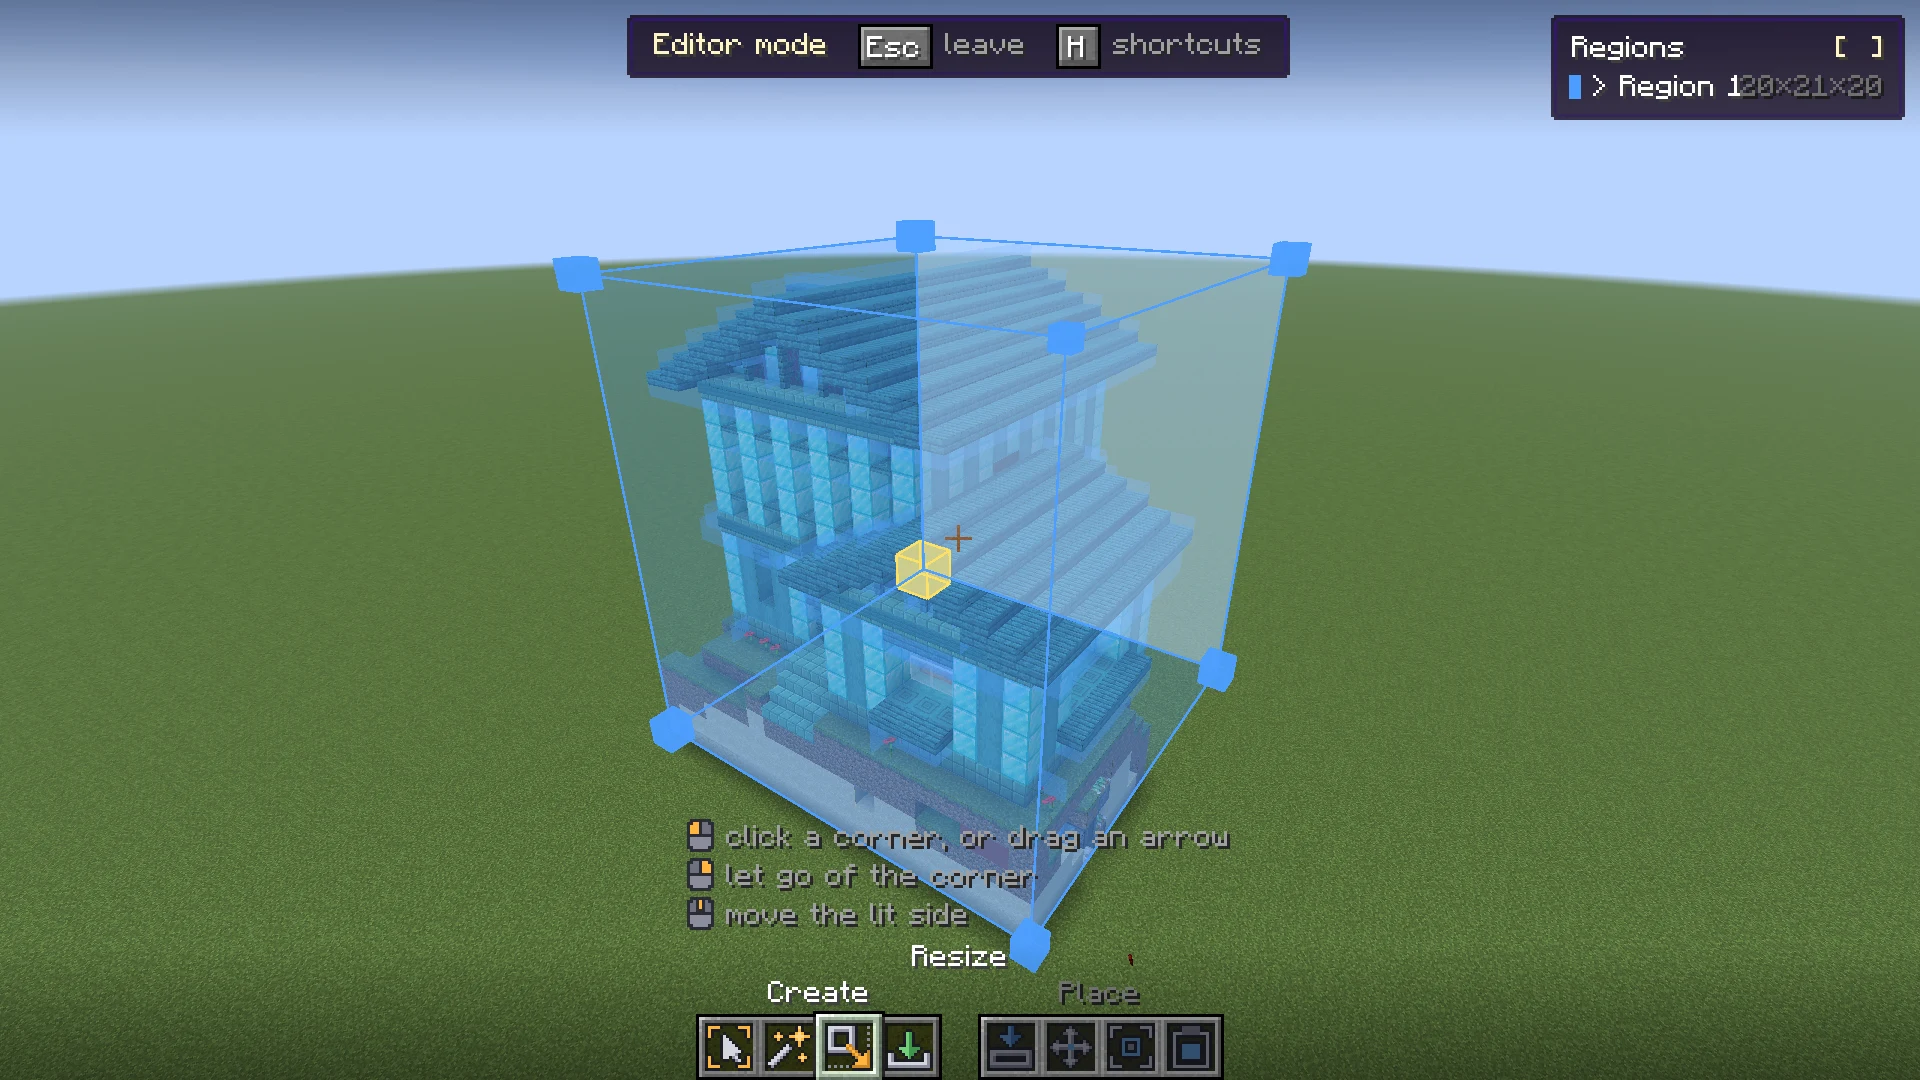
Look at a side and scroll. The quickest way, with Select or Resize. Aim near the middle of a side: it lights up. Scroll up to push it out and down to pull it in, a block a step. You pick a side only by looking at its middle, from anywhere, so the far side and the sides behind others work too, and nothing needs to be in the way of the crosshair. The lit side stays lit while you scroll, so your view can wander. A box stops at one block thick.
Or drag a corner:
- With Resize (3), click a corner cube. Arrows come up on it, and they show through terrain.
- Drag an arrow, a flat square or the white cube to pull the corner.
- Or face a direction and scroll: the corner goes that way, so a top corner needs no drag.
- Right-click lets go of the corner.
While you drag, the edges of the box pull in to what is built, and the bottom onto the ground. Hold Alt while you drag to place an edge freely, or turn off Snap in the editor. Scrolling a side does not snap.
Moving the camera #
The camera comes loose and flies, so you can look at a build from all sides, also in survival. Some servers do not allow a free camera. The first time you edit on a server, BuildPrint asks how you want to move: Free camera or Walk. With Walk you stay in your own body, walk as usual and edit from where you stand. C switches between the two while you edit, and the choice is remembered per server. A server with VoxelSprout Policy can turn the free camera off; you then always edit from where you stand.
| Key | Action |
|---|---|
| WorAorSorD | Fly, or walk |
| Space | Up |
| Shift | Down |
| Ctrl | Fly faster while you hold it, as your sprint key does |
| Ctrl + Scroll | Camera speed, on every tool. It shows the speed and is remembered |
| C | Switch between the free camera and walking |
| ,or. | Layer down or up |
| H | Show or hide the list of editor keys |
| Esc | Cancel what is half done, then leave the editor |
How you move in your own worlds and on new servers is set under Other mods in the Schematics tab of the settings. Forget next to a server makes it ask again.
On a Mac #
- Command works as Ctrl, and Option is Alt. The editor says so on screen.
- A trackpad or Magic Mouse scrolls in steps, so one flick moves a box a step or two and does not run away.
- Delete on a Mac keyboard removes the active box.
With commands #
Everything the editor does can also be done from chat. /buildprint editor opens or leaves the editor, and /buildprint editor tool <tool> picks a tool. /buildprint select pos1 and pos2 set the corners of a box at the block you look at or at coordinates, magic selects the build you look at, grow, shrink and move change the box, and /buildprint select save <name> saves it. /buildprint place moves a loaded build. Every command is on Commands.
Tools from other mods #
Other mods can add tools to the editor. They show up on the toolbar after the built-in ones, sometimes in a group of their own. The number keys up to 9 and 0 pick them, and Tab shows them all. For how to make one, see Editor API.
Next, you may want to
Something missing or wrong on this page? Say so on Discord.